
- Published:April 10th, 2008
- Comments:8 Comments
- Category:Extending Firebug Tutorial
I have finally got some time to write another piece of the tutorial. This time I’ll explain how to use an Options menu that is available in every Firebug’s panel. This menu is located at the right side of a tab-bar.
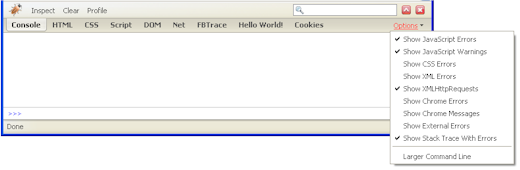
See an example of Console Options menu from Firebug 1.1
The main purpose of the menu (as the name clearly indicates) is to expose panel-specific options (preferences), so the user can access them and change theirs value if necessary.
Simple example
The menu is already built within Firbug’s UI. So, all we have to do is to provide a content. This is done by getOptionsMenuItems method that must be implemented in the specific panel object (i.e. HelloWorldPanel in our case).
HelloWorldPanel.prototype = extend(Firebug.Panel,
{
// . . .
getOptionsMenuItems: function(context) {
return [{
label: "My Menu Item",
nol10n: true,
type: "checkbox",
command: function() { alert("Hello from the Options menu!"); }
}];
}
});
This method is called by the framework when the user clicks on the Options menu - just before it’s displayed. Each object returned in the array represents a menu-item. Following properties are supported.
| label | (string) | The label that will appear on the menu item. |
| nol10n | (boolean) | Indicates whether the label should be localized. *) |
| type | Specifies type of the menu. | |
| checked | (boolean) | Indicates whether the element is checked or not. |
| disabled | (boolean) | Indicates whether the element is disabled or not. |
| image | (image URL) | The URL of the image to appear on the menu item. |
| command | (js-function) | java script menu item handler. |
*) This is only for strings coming from firebug.properties file. Should be always set to true for third party strings.
Real options
Let’s develop more useful example that uses the menu for real options (preferences). First of all, we’ll define default preferences ...
pref("extensions.firebug.helloworld.option2", false);
... and put them into a prefs.js file, which is located at proper location within extension's directory structure.
helloworld@janodvarko.cz/
    chrome/
        content/
            helloworld/
                helloWorld.xul
                helloWorld.js
    defaults/
        preferences/
            prefs.js
    chrome.manifest
    install.rdf
Now, see new implementation of the getOptionsMenuItems method, which displays both new preferences and makes possible to change theirs values.
HelloWorldPanel.prototype = extend(Firebug.Panel,
{
// . . .
getOptionsMenuItems: function(context)
{
return [
this.optionMenu("Option1", "helloworld.option1"),
"-",
this.optionMenu("Option2", "helloworld.option2")
];
},
optionMenu: function(label, option)
{
var value = Firebug.getPref(Firebug.prefDomain, option);
return {
label: label,
nol10n: true,
type: "checkbox",
checked: value,
command: bindFixed(Firebug.setPref, this, Firebug.prefDomain, option, !value)
};
}
});
As you can see, there is a new helper method optionMenu that creates a menu-item object. The method takes two parameters: a label and a preference name.
Notice that menu-item-separator is created just with simple "-" string.
The most interesting thing is probably the implementation of optionMenu method. First of all, we are utilizing get & setPref methods from Firebug namespace:
Firebug.setPref(prefDomain, name, value);
This example considers Firebug 1.2 (these methods are different in 1.1).
The usage is quite obvious. The first parameter is used to specify preference domain, the second specifies preference name and the third - new preference value. The domain should be "extensions.firebug" (there is a constant Firebug.prefDomain for that).
Further, there is a new bindFixed method. Could sound familiar to you as this pattern is often used in JS libraries (e.g. Prototype). In this example, bindFixed is used to bind a method (Firebug.setPref) to a handler (command), with three parameters (Firebug.prefDomain, option, !value).
The source code is worth a thousands words, so here is how the method looks like:
{
var args = cloneArray(arguments), fn = args.shift(), object = args.shift();
return function() { return fn.apply(object, args); }
};
Finally, if you want to test it, don't forget to open the about:config page in order to see how the preference is changing.

The extension can be downloaded here (you need Firebug 1.2 ).


8 Comments
Great tutorial thanks 🙂
Excellent post, thanks!
I added history functionality to the Firebug's Net Panel, might be useful:
http://digitalmihailo.blogspot.com/2008/04/network-history-support-for-firebug.html
Cheers,
Mihailo
I'm lovin these so far. Thanks
You've saved me many hours.
I think this part is a little bit outdated. There are no more "options" in Firebug 1.4.x. They are combined into toolbars
Hi, thanks for your tutorials.
Now I know how handle checkbox menu but how I can handle radio type menu?
Thanks again
@Luca: this probably needs new API in Firebug, please report a new bug here: http://code.google.com/p/fbug/issues/list and I'll do it (or create an example).
Very good tutorial. Is there a way to access the options item after created, in order to manually update the checked or disabled attribute?
@Ferlings: the menu is recreated every time it's opened (using getOptionsMenuItems) so, you should make sure all menu items are created in the right state at the moment.