Subscribe to RSS Feed

Next step in this tutorial is intended to show how a new button can be created within Firebug's toolbar. This part will demonstrate two things (a) how to create a new button that is associated with our "Hello World!" panel and (b) how to append a new button to an existing panel (it'll be the Net panel that is used to monitor network activities). There is also some info about a Model, which is important part of a Firebug extension.

Create button for Hello World! panel

In order to append a new button to our panel, the HelloWorld.xul file has to be modified. This file represents the FB overlay and has been introduced in the previous part.

<?xml version="1.0"?><overlay xmlns="http://www.mozilla.org/keymaster/gatekeeper/there.is.only.xul">
    <script src="chrome://helloworld/content/helloWorld.js" type="application/x-javascript"/>

    <commandset id="mainCommandSet">
        <command id="cmd_hwMyButton" oncommand="Firebug.HelloWorldModel.onMyButton(FirebugContext)"/>
    </commandset>

    <toolbar id="fbToolbar" align="center">
        <hbox id="fbToolbarInner" insertbefore="fbDetachButton" flex="1" align="center">
            <hbox id="fbHelloWorldButtons" insertafter="fbNetButtons">
                <toolbarseparator/>
                <toolbarbutton id="hwMyButton"
                    label="Say Hello" class="toolbar-text-button"
                    tooltiptext="Push to say hello" command="cmd_hwMyButton"/>

           </hbox>
       </hbox>
    </toolbar>
</overlay>

This code inserts new button at appropriate location within the Firebug's UI. Notice that our hwMyButton button uses command cmd_hwMyButton that is consequently associated with following javascript method.

Firebug.HelloWorldModel.onMyButton(FirebugContext)

There is a few new things to explain, but let's take a look at the source code first.

FBL.ns(function() { with (FBL) {
var panelName = "HelloWorld";
Firebug.HelloWorldModel = extend(Firebug.Module,
{
    showPanel: function(browser, panel) {
        var isHwPanel = panel &amp;&amp; panel.name == panelName;
        var hwButtons = browser.chrome.$("fbHelloWorldButtons");
        collapse(hwButtons, !isHwPanel);
    },

    onMyButton: function(context) {
        alert("Hello World!");
    }
});

function HelloWorldPanel() {}
HelloWorldPanel.prototype = extend(Firebug.Panel,
{
    name: panelName,
    title: "Hello World!",

    initialize: function() {
        Firebug.Panel.initialize.apply(this, arguments);
    }
});

Firebug.registerModule(Firebug.HelloWorldModel);
Firebug.registerPanel(HelloWorldPanel);

}});

First of all, there is a new object called HelloWorldModel. This object is derived from internal Model object and represents data model of the extension. Similarly to the Panel, the Model has to be registered within a global Firebug object.

From the MVC perspective the model could be seen as an entity representing a model and a controller at once - it can be used as a data container and handle some user actions at the same time. Important thing is that there is only one instance of the HelloWorldModel object per Firefox main window (browser.xul), which makes possible to share data among web pages within the same browser window.

There is even another object called Context (can be also interpreted as a data model). Every page with enabled Firebug has it's own instance of this object and it's used to store data associated with the page. You'll see that this object is passed as a parameter to many functions.

See the following UML diagram that depicts described relations.
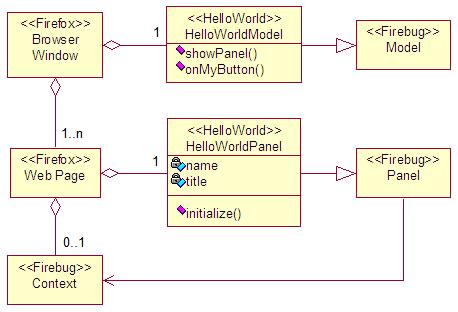
Panel, Model and Context relations

It's not pure UML as in context of JavaScript there are no real classes and "Browser Window" and "Web pages" are just placeholders here (so I hope UML experts will forgive me ;-), but following should be obvious from it:

  • The Model object should be used for data shared among pages within the same browser window.
  • The Context object should be used for data associated with a web page.
  • The Panel object should be used to store presentation data (i.e. HTML)

Just to notice, that Panel has a reference to the Context object, which is set in initialize() method. This is why the predecessor method must be called.

The last important thing in this example is showPanel method.

    showPanel: function(browser, panel) {
        var isHwPanel = panel &amp;&amp; panel.name == panelName;
        var hwButtons = browser.chrome.$("fbHelloWorldButtons");
        collapse(hwButtons, !isHwPanel);
    },

This method is executed by Firebug's framework whenever a panel is displayed. This is the right place where to decide whether our set of buttons (identified as fbHelloWorldButtons) should be displayed or not. The first parameter browser - represents browser window (browser.xul) and the second parameter panel - the panel being activated. According to the panelName we can decide whether to collapse (hide) our button(s).

Notice that the collapse method comes from FBL namespace (about namespaces later).

The button should look like as follows.
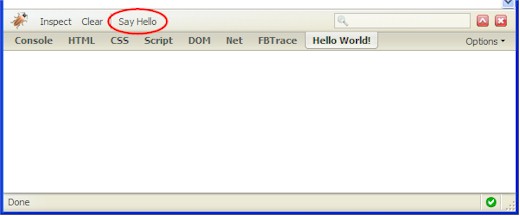
A new button for Hello World! panel

Create button for an existing panel

Finally, let's take a look at how to overlay an existing set of buttons. This should be simple task now, see the modified helloWorld.xul overlay.

<?xml version="1.0"?>

<overlay xmlns="http://www.mozilla.org/keymaster/gatekeeper/there.is.only.xul">
    <script src="chrome://helloworld/content/helloWorld.js" type="application/x-javascript"/>

    <commandset id="mainCommandSet">
        <command id="cmd_hwMyButton" oncommand="Firebug.HelloWorldModel.onMyButton(FirebugContext)"/>
        <command id="cmd_hwDisableNetMonitoring"
            oncommand="Firebug.HelloWorldModel.onDisableNetMonitoring(FirebugContext)"/>

        </commandset>

    <toolbar id="fbToolbar" align="center">
        <hbox id="fbToolbarInner" insertbefore="fbDetachButton" flex="1" align="center">

            <hbox id="fbNetButtons">
                <toolbarseparator/>
                <toolbarbutton id="hwDisableNetMonitor"
                    label="Disable Net Monitoring" class="toolbar-text-button" type="checkbox"
                    tooltiptext="Press To Disable Network Monitoring"
                    command="cmd_hwDisableNetMonitoring"/>

            </hbox>

            <hbox id="fbHelloWorldButtons" insertafter="fbNetButtons">
                <toolbarseparator/>
                <toolbarbutton id="hwMyButton"
                    label="Say Hello" class="toolbar-text-button"
                    tooltiptext="Push to say hello" command="cmd_hwMyButton"/>

            </hbox>
        </hbox>
    </toolbar>
</overlay>

There is new overlay for fbNetButtons, which is identifier of an existing set of buttons (for the Net panel). And of course, appropriate javascript handler. So, a method has to be appended to the HelloWorldModel object.

Firebug.HelloWorldModel = extend(Firebug.Module,
{
    // . . .

    onDisableNetMonitoring: function(context) {
        alert("OK, the click is handled");
    }
});

And this is how it should look like.
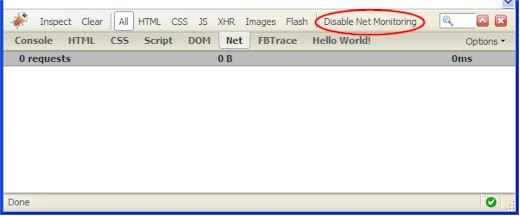
A new button for Net panel

The extension can be downloaded here.

Update: the example extension uses FirebugContext global variable that has been replaced by Firebug.currentContext in Firebug 1.6+. So, make sure to use the correct one when building an extension for Firebug. See also this thread

It's been a while since I have started contributing to Firebug. Everybody use this amazing Firefox extension and I am having great time with exploring the underlying architecture. Well, it was hard time at the beginning 😉 I had to dive into unknown waters and understand what's under the hood. I remember it quite exactly, I have spent many hours with debugging a debugger trying to understand how it works.

I was searching the web intensively and if anybody would like to enjoy the same journey, I would recommend to check out Christoph Dorn's awesome article on Extending Firebug. There is also a cool page about Firebug Internals written by John J. Barton. And last but not least source of information is certainly Firebug Group page, yep you can always ask there...

However, what I was really looking for was a step by step tutorial that starts with the familiar "Hello World!" application. I didn't find it. So, I decided to write down something by myself. Perhaps it will be useful for those programmers, who are interested in contributing to Firebug, extending Firebug or developing an entirely new extension for Firefox. So, here it is: Firebug tutorial for extension developers.

Hello World!

The first thing to do is to setup a structure of the extension. This step is easy if you are already familiar with Firefox extension development.

In this case, the directory structure should look like this:

helloworld@janodvarko.cz/
    chrome/
        content/
            helloworld/
                helloWorld.xul
                helloWorld.js
    chrome.manifest
    install.rdf

The most important files are obviously helloWorld.xul and helloWorld.js. These two files contains the actual Hello World! implementation. The other two files are used by Firefox to properly install the extension.
See the chrome.manifest first.

content helloworld chrome/content/helloworld/ xpcnativewrappers=no

overlay chrome://firebug/content/firebugOverlay.xul         chrome://helloworld/content/helloWorld.xul

Notice that xpcnativewrappers=no turns off security tests. After revisiting this code, I would recommend to remove the option or at least be aware of it.

The file specifies that there is a content under chrome/content/helloworld/ directory and that our helloWorld.xul represents an overlay for firebugOverlay.xul. If you are interested, see an article about chrome registration here.

The install.rdf contains standard information about the extension. No comment is needed for this, see detailed info about install manifests here if you want.

<?xml version="1.0"?><RDF xmlns="http://www.w3.org/1999/02/22-rdf-syntax-ns#"
  xmlns:em="http://www.mozilla.org/2004/em-rdf#">

  <Description about="urn:mozilla:install-manifest">
    <em:id>helloworld@janodvarko.cz</em:id>
    <em:version>0.0.1</em:version>

    <!-- Firefox -->
    <em:targetApplication>
      <Description>
        <em:id>{ec8030f7-c20a-464f-9b0e-13a3a9e97384}</em:id>
        <em:minVersion>1.5</em:minVersion>
        <em:maxVersion>3.0.0.*</em:maxVersion>
      </Description>
    </em:targetApplication>

    <!-- Extension -->
    <em:name>Hello World!</em:name>
    <em:description>Firebug Hello World! Extension</em:description>
    <em:creator>Jan Odvarko</em:creator>
    <em:homepageURL>http://www.janodvarko.cz</em:homepageURL>
  </Description>
</RDF>

The helloWorld.xul is currently almost empty (be patient there'll be more things later), only the helloWorld.js is included.

<?xml version="1.0"?>

<overlay xmlns="http://www.mozilla.org/keymaster/gatekeeper/there.is.only.xul">
  <script src="chrome://helloworld/content/helloWorld.js" type="application/x-javascript"/>
</overlay>

This is how the JS script looks like:

FBL.ns(function() { with (FBL) {

function HelloWorldPanel() {}
HelloWorldPanel.prototype = extend(Firebug.Panel,
{
    name: "HelloWorld",
    title: "Hello World!",

    initialize: function() {
      Firebug.Panel.initialize.apply(this, arguments);
    },
});

Firebug.registerPanel(HelloWorldPanel);

}});

The main and only purpose of helloWorld.js so far, is to create and register a new Firebug Panel (tab). Notice that a Panel plays the same role as a View in MVC (Model View Controller) design pattern. In other words, the Panel is intended to present data to the user.

So, there is a new object called HelloWorldPanel, which is extended from internal Firebug.Panel object. The extension mechanism is realized through extend function, which creates a new object and copies all properties from the first parameter (predecessor object - Firebug.Panel) and then all properties from the second parameter (our new panel - HelloWorldPanel) into it. The object is then returned from the function. You could see this as an imitation of class inheritance.

Our Panel has two properties and a method. Theirs meaning is quite obvious, a name is used to identify the panel (should be unique so, we can access it through getPanel method later) and a title (which is display name of the tab). The later should be localized, but don't worry about it now, we'll deal with these nitpickings later. There is even an initialize method. This is called automatically by the framework when the Panel is activated (displayed) at the first time. It's empty now, but it'll be useful for Panel initialization. Don't forget to call predecessor method, there is some initialization to be made.

Firebug.registerPanel(HelloWorldPanel);

Finally, the new panel object is registered and so, Firebug can ensure it's properly displayed.

Careful reader might have noticed that entire code is surrounded by a following code:

FBL.ns(function() { with (FBL) {

  // Panel definition

}});

This is how namespaces are realized in Firebug framework. It's smart and useful. This makes possible to avoid global variables and so, dangerous collisions. Something, which everybody should take care of. However let's just use it as it is for now, we'll fall in to this later.

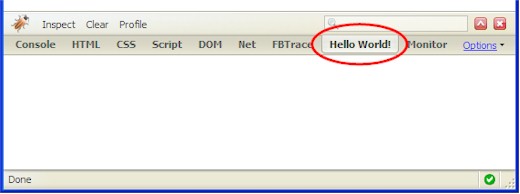
Ok, that's it for now. See the following screen-shot that shows how the new panel should look like within Firebug's UI.

A new panel (tab) within Firebug.

The extension can be downloaded here.

Next time we'll take a look at how to create a new button for our panel and associate a logic with it...

« Previous Page